Wednesday, March 16, 2022

Wow! January to June mini catalog 2022 is amazing!

Hello ! I am glad to be back with you. I have been away for a little while for a very good reason! I have had the opportunity to keep my new grand-daughter who was born in August 2021, as well as my other grandchildren while their Moms and Dads are away at work. I am still doing that, but they are a little older now and "Nana"  has gotten in the swing of our routine. 

The January to June 2022 Mini catalog is a " must see" and experience first hand. I have been enjoying Stampin' Up! (SU!) for a very long time and I have to say this publication is one of their best! The products are fun to use and offer such a variety of possibilities. So many sets can be used together since they share similar themes; not only that, but they can also be used with items from the past ("retired" sets") as well as sets from the Annual Catalog (AC) 2021-2022. Your creativity can explode! There are photos of cards the designers from SU! have made that can be easily "copied and shared." I have often used their design as my starting point and once I start using the products, the ideas begin to flow. 

In our world today, so many people need encouraging words from friends and loved ones. Many do not have a network of friends though; cards that you make can be shared with residents of nursing homes, our military, medical and rescue personnel, etc. Your card will become a conversation piece that could open a dialog between possible new friends or re-kindle relationships.

Look at this card! It looks complicated because of the details, but truly it was not hard to make . Give it a try! You can use rectangles, circles, or any open die cut for the window. I have used a clear window sheet behind the die cut but you could also use vellum, or even leave it open if your die cut supports that. 


This fun card incorporates both the Greenhouse Garden bundles as well as the Home and Garden bundle. I also used the brick stamp from the Welcoming Window set (AC page 15). The Designer's Series Paper is my favorite of all time , Bloom Where You're Planted, from the Annual Catalog 21-22. The card is a stand up card, but will lay flat in a regular A2 envelope for mailing. I put some elements inside the greenhouse window, but you certainly can just use the DSP in the back as a decorative backdrop. 
Thank you to Cindy Lee Bee Designs for the layout. 
Her video with explanations for her card is here: https://cindyleebeedesigns.com/2022/03/09/stampin-up-plentiful-plants-center-column-pop-up-fun-fold-video-tutorial/

Here is another one of my examples. 


Supplies :

Cardstock (CS) and Paper:

   Evening Evergreen. 155574

    Bloom Where You’re Planted DSP   155696

   Basic White. 159276

   Cinnamon Cider. 153078

  Window sheet.  142314

   Adhesive Sheets.  152334

   Scraps of various green Cardstock

Ink Pads:

     Evening Evergreen.  155576

     Cinnamon Cider.  153114

     Soft Succulent.  155778

     Pale Papaya.  155670

     Polished Pink.  155712

     Versamark     102283

Blends: Cinnamon Cider.  153105

             Smokey Slate     154904

             Crumb Cake.    154882

Stamp Sets:

     Welcoming Window   154504

            Bundle.   159529

     Garden Greenhouse.  157731

            Bundle.   157733

     Home and Garden Bundle.  157919

Embossing Powder basic set (white) 155554

Pebbles Enamel Shapes.  158141

SCEM  149653

Heat Tool   129053

Take Your Pick Tool.  144107

Bone Folder.  102300

Paper Trimmer.  152392

Envelopes.  159236

Stampin’ Seal.  152813

Tombow Glue.  110755.    Dimensionals.  104430

Scissors   103579    Stampin’ Scrub.  126200

Blocks: B 117147, D 118485, E 118484    

   Measurements in Imperial (inches)

Card Base  5 1/2 x 4 1/4

Column folding mechanism 4 1/4 x 9 1/2

   SCORE on long side: 1/2, 1 1/4,  2,  2 3/4,

                                6 3/4,  7 1/2,  8 1/4 

Window Sheet. 4 x 3 3/4 

Adhesive sheet : 2 3/4 x 3 1/8

Layers:

DSP on back of window 5 1/4 x 4

Back side panels (2): 4 x 1

DSP on front 4 x 3 3/4

DSP for cutting out greenhouse  3 x 3 1/8

Strip for Sentiment:: 3 1/2 x 1/2

Back white. 4 x 5 1/4

DSP same as back of window (2) 1/2 x 4

Steps:

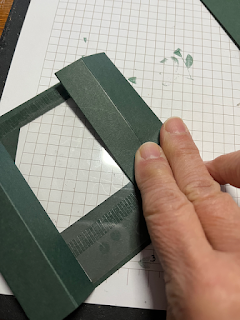
  1. Score the front panel and burnish score lines
  2. Adhere adhesive sheet to DSP and die cut the greenhouse
  3. Adhere front center panel DSP; die cut the window 
  4. Adhere window sheet to front inside
  5. Adhere the greenhouse to the window sheet
  6. Adhere the back DSP and then add the 1” pieces (if you want it different ) to the outer edges of the DSP
  7. Adhere the 1/2 DSP to the 1/2 inch out edge sections on the column mechanism
  8. On one side, adhere that section to the window sheet (this will be on the inside of the window) making a foldable square; repeat on the other side 


9. Mark on the square the section  that will need adhesive and set aside


10. Stamp and die cut the greenery and the tools; color with blends

11. Measure how far it is from the bottom of the front to the window bottom. This will help place the tools not he inside of the card. Configure the inner elements and adhere using glue/dimensionals

12. Apply adhesive to the marked areas on the column mechanism and the line up the other edge of the square to the  side edge of the back base 


13. Decorate the front of the card as desired.

14. Stamp the sentiment with Versamark; emboss with white embossing powder

15. Adhere with Dimensionals to the card front. 


16 Stamp the white panel for the back of the card which will serve as the signature page. 


17. For video instructions for a similar card, visit  

      https://cindyleebeedesigns.com/2022/03/09/stampin-up-plentiful-plants-center-column-pop-up-fun-fold-video-tutorial/


1 comment:

  1. I have been so tempted by that greenhouse! It is so unique. I like what you did with it!

    ReplyDelete

Coffee Scented Cards.....who knew????

  WHAT?? Scented cards?? Yes, and it is EASY! I had a workshop this weekend using the Latte Love bundle and DSP. As chance would have it, wh...