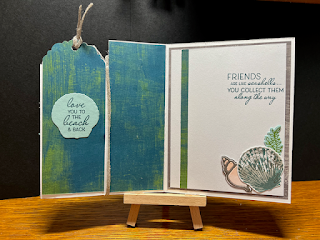
Detachable Bookmark Card: SUOC #327
Inside : The sentiment is place far to the right so after the bookmark is detached, the card still has a sentiment as well as visual elements.
These cards are so much fun to make! And they are useful beyond the "OOOOOs" and "AAHHHs" you will get when the special recipient receives the card. The bookmark will remind them of you for years to come. The main "ingredient" for making this card is a serrated blade or as noted in the Annual Catalog (page 145) a perforated rotary blade. Many years ago Stampin' Up! had a similar gadget for making cards with a detachable feature; it was a rotary blade on a separate arm which attached to the trimmer. It works like a charm, but it is big and bulky and not real user friendly. I also was gifted one time a set of Tim Holtz gadgets and one of those was a small perforating blade. I am really anxious to see how the new blade that attaches to the Take Your Pick tool works. I believe it will be a great addition for everyone to have in their arsenal. I have a few pictures to show you about how each one of the gadgets I have mentioned works; I hope you will get the fever for making these cards and order the new blade attachment in the current catalog.
The front and the inside DSP should be cut. Emboss or stamp the DSP , prior to adhering to the card. Since both sides of the bookmark will be seen by the recipient, you want to decorate both sides. The ribbon is not only to add interest but also to hide the perforation line. The ribbon should remain unattached with adhesive, but if you see that it is necessary, use removable glue dots. You can opt to add a note for the recipient to use the ribbon at the top of the book mark after they detach it from the card base.As with any book mark, you don't want it bulky inside of your book, nor do you want elements from the card dislodged inside of your book. Keep those points in mind as you decorate your card front.
Product List I punched the basic white thick card stock with the Delightful Tag Topper punch first; that gave me a guide for cutting the perforations. If you put a corner of the card stock in the punch first, it will be easier to line up.
Here are both examples of perforating the card stock.
This is the Tim Holtz blade used with a straight edge (ruler) on a cutting mat.
The Stampin' Up! rotary blade attachment (2015 purchase I believe) really worked better in my opinion.I have a feeling they have used the same expertise in the gadget they offer currently. One lesson I learned the hard way is that you don't use the perforating blade with an open track in the trimmer. I turned the track over so there was not an opening, but rather it was solid.
Other examples:
I found myself puling out so many stamp sets and dies as well as punches to make these. My mind was reeling with what I could use next. I love using new stamp sets, DSP, punches, and dies along with beloved retired items. (Hence the name "Newstalgia Stamping".) NOTE: I used the Seaside embossing folder on the first card, but I couldn't find it to include it in the product list below.


Gorgeous card!! WOW! You've really done a great job putting all the elements together!! (and now I need to try my perforating tip!). Thanks for sharing at SUOC!!
ReplyDeleteSally, I absolutely love all of your bookmark cards with the great tutorial! Thank you so much for playing along with us at SUOChallenges.com and hope that you join us again tomorrow!
ReplyDeleteThese cards are gorgeous. Thanks for the tutorial. You reminded me that I need to add the Take Your Pick crafters tips to my next order. :)
ReplyDelete